本文转载自:XILINX开发者社区微信公众号
机器学习中一个常见问题是判定与数据交互的最佳方式。
在本文中,我们将提供一种高效方法,用于完成数据的交互、组织以及最终变换(预处理)。随后,我们将讲解如何在训练过程中正确地把数据输入给模型。
PyTorch 框架将帮助我们实现此目标,我们还将从头开始编写几个类。PyTorch 可提供更完整的原生类,但创建我们自己的类可帮助我们加速学习。
第 1 部分:原始数据和数据集
首先我们把尚未经过组织的所有样本称为“原始数据”。
把“数据集”定义为现成可用的数据,即含标签以及基本函数接口(以便于使用原始数据信息)的原始数据。
此处我们使用一种简单的原始数据形式:1 个包含图像和标签的文件夹。
但此方法可扩展至任意性质的样本(可以是图片、录音、视频等)以及包含标签的文件。
标签文件中的每一行都用于描述 1 个样本和相关标签,格式如下:
file_sample_1 label1
file_sample_2 label2
file_sample_3 label3
(...)
当能够完成一些基本信息查询(已有样本数量、返回特定编号的样本、预处理每个样本等)时,说明我们已从原始数据集创建了 1 个数据集。
此方法基于面向对象编程以及创建用于数据处理的 “类”。
对于一组简单的图像和标签而言,此方法可能看上去略显杀鸡用牛刀(实际上,此用例通常是通过创建分别用于训练、验证和测试的独立文件夹来进行处理的)。但如果要选择标准交互方法,则此方法将来可复用于多种不同用例,以节省时间。
在 Python 中处理数据
在 Python 中所有一切都是对象:整数、列表、字典都是如此。
构建含标准属性和方法的“数据集”对象的原因多种多样。我认为,代码的精致要求就足以合理化这一选择,但我理解这是品味的问题。可移植性、速度和代码模块化可能是最重要的原因。
在许多示例以及编码书籍中,我发现了面向对象的编码(尤以类为甚)的其它有趣的功能和优势,总结如下:
• 类可提供继承
• 继承可提供复用
• 继承可提供数据类型扩展
• 继承支持多态现象
• 继承是面向对象的编码的特有功能
■输入 [1]:
import torch

from torchvision import transforms

to_tensor = transforms.ToTensor()


from collections import namedtuple

import functools

import copy

import csv

from PIL import Image

from matplotlib import pyplot as plt

import numpy as np

import os

import datetime

import torch.optim as optim
在我们的示例中,所有原始样本都存储在文件夹中。此文件夹的地址在 raw_data_path 变量中声明。
■输入 [2]:
raw_data_path = './raw_data/data_images'
构建模块
数据集接口需要一些函数和类。数据集本身就是一个对象,因此我们将创建 MyDataset 类来包含所有重要函数和变量。
首先,我们需要读取标签文件,然后可对样本在其原始格式(此处为 PIL 图像)以及最终的张量格式应用某些变换。
我们需要使用以下函数来读取 1 次标签文件,然后创建包含所有样本名称和标签的元组。
内存中缓存可提升性能,但如果标签文件发生更改,请务必更新缓存内容。
■ 输入 [113]:
DataInfoTuple = namedtuple('Sample','SampleName, SampleLabel')

def myFunc(e):

  return e.SampleLabel


# in memory caching decorator: ref https://dbader.org/blog/python-memoization

@functools.lru_cache(1)

def getSampleInfoList(raw_data_path):

    sample_list = []

    with open(str(raw_data_path) + '/labels.txt', mode = 'r') as f:

        reader = csv.reader(f, delimiter = ' ')

        for i, row in enumerate(reader):

            imgname = row[0]

            label = int(row[1])

            sample_list.append(DataInfoTuple(imgname, label))

    sample_list.sort(reverse=False, key=myFunc)

    # print("DataInfoTouple: samples list length = {}".format(len(sample_list)))

return sample_list
如需直接变换 PIL 图像,那么以下类很实用。
该类仅含 1 种方法:resize。resize 方法能够改变 PIL 图像的原始大小,并对其进行重新采样。如需其它预处理(翻转、剪切、旋转等),需在此类种添加方法。
当 PIL 图像完成预处理后,即可将其转换为张量。此外还可对张量执行进一步的处理步骤。
在以下示例种,可以看到这两种变换:
■ 输入 [4]:
class PilTransform():

    """generic transformation of a pil image"""

    def resize(self, img, **kwargs):

        img = img.resize(( kwargs.get('width'), kwargs.get('height')), resample=Image.NEAREST)

        return img

# creation of the object pil_transform, having all powers inherited by the class PilTransform

pil_transform = PilTransform()
以下是类 PilTransform 的实操示例:
■ 输入 [5]:
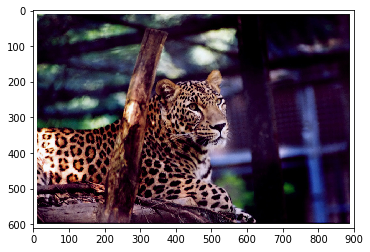
path = raw_data_path + "/img_00000600.JPEG"

print(path)

im1 = Image.open(path, mode='r')

plt.imshow(im1)
./raw_data/data_images/img_00000600.JPEG
■ 输出 [5]:
<matplotlib.image.AxesImage at 0x121046f5588>
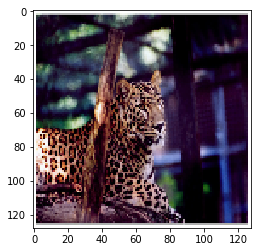
■ 输入 [6]:
im2 = pil_transform.resize(im1, width=128, height=128)

# im2.show()

plt.imshow(im2)
■ 输出 [6]:
<matplotlib.image.AxesImage at 0x12104b36358>
最后,我们定义一个类,用于实现与原始数据的交互。
类 MyDataset 主要提供了 2 个方法:
__len__ 可提供原始样本的数量。
__getitem__ 可使对象变为可迭代类型,并按张量格式返回请求的样本(已完成预处理)。
__getitem__ 步骤:
1) 打开来自文件的样本。
2) 按样本的原始格式对其进行预处理。
3) 将样本变换为张量。
4) 以张量格式对样本进行预处理。
此处添加的预处理仅作为示例。
此类可对张量进行归一化(求平均值和标准差),这有助于加速训练过程。
请注意,PIL 图像由范围 0-255 内的整数值组成,而张量则为范围 0-1 内的浮点数矩阵。
该类会返回包含两个元素的列表:在位置 [0] 返回张量,在位置 [1] 返回包含 SampleName 和 SampleLabel 的命名元组。
■ 输入 [109]:
class MyDataset():

    """Interface class to raw data, providing the total number of samples in the dataset and a preprocessed item"""

    def __init__(self,

                 isValSet_bool = None,

                 raw_data_path = './',

                 SampleInfoList = DataInfoTuple,norm = False,

                 resize = False,

                 newsize = (32, 32)

                ):

        self.raw_data_path = raw_data_path

        self.SampleInfoList = copy.copy(getSampleInfoList(self.raw_data_path))

        self.isValSet_bool = isValSet_bool

self.norm = norm

        self.resize = resize

        self.newsize = newsize


    def __str__(self):

        return 'Path of raw data is ' + self.raw_data_path + '/' + ''

    def __len__(self):

        return len(self.SampleInfoList)

    def __getitem__(self, ndx):

        SampleInfoList_tup = self.SampleInfoList[ndx]

        filepath = self.raw_data_path + '/' + str(SampleInfoList_tup.SampleName)

        if os.path.exists(filepath):

            img = Image.open(filepath)

            # PIL image preprocess (examples)

            #resize

            if self.resize:

                width, height = img.size

                if (width >= height) & (self.newsize[0] >= self.newsize[1]):

                    img = pil_transform.resize(img, width=self.newsize[0], height=self.newsize[1])

                elif (width >= height) & (self.newsize[0] < self.newsize[1]):

                    img = pil_transform.resize(img, width=self.newsize[1], height=self.newsize[0])

                elif (width < height) & (self.newsize[0] <= self.newsize[1]):

                    img = pil_transform.resize(img, width=self.newsize[0], height=self.newsize[1])

                elif (width < height) & (self.newsize[0] > self.newsize[1]):

                    img = pil_transform.resize(img, width=self.newsize[1], height=self.newsize[0])

                else:

 print("ERROR")


            # from pil image to tensor

            img_t = to_tensor(img)


            # tensor preprocess (examples)

            #rotation

            ratio = img_t.shape[1]/img_t.shape[2]

            if ratio > 1:

                img_t = torch.rot90(img_t, 1, [1, 2])

            #normalization requires the knowledge of all tensors

            if self.norm:

                img_t = normalize(img_t)


            #return img_t, SampleInfoList_tup

            return img_t, SampleInfoList_tup.SampleLabel

        else:

            print('[WARNING] file {} does not exist'.format(str(SampleInfoList_tup.SampleName)))

            return None
如需了解后续步骤,请期待本系列更多文章~