本文转载自:亦梦云烟的博客
在第三节中,我们成功创建了ZYNQ裸机下的SDSoC平台文件,但在实际使用中,要求使用Linux操作系统。本节介绍如何创建基于Linux系统的硬件平台。
一、创建Linux启动文件
使用PetaLinux创建Linux启动文件,在PetaLinux学习02-创建PetaLinux工程.note中有详细的介绍。本节只做操作流程介绍。
1.1 使用PetaLinux创建Linux启动文件
首先确保使用vivado创建的工程功能完整正常,导出HDF文件,在PetaLinux环境中操作:
$ petalinux-create --type project --template zynq --name ZturnTemplate
$ cd ZturnTemplate/
$ petalinux-config --get-hw-description=../ZturnHW/system_wrapper_hw_platform_0
$ petalinux-config
//配置启动参数
DTG Settings --->
Kernel Bootargs --->
[] generate boot args automatically(OFF)
user set kernel bootargs(console=ttyPS0,115200 earlyprintk quiet)
$ petalinux-config -c rootfs
//添加stdc++库的支持:
Filesystem Packages --->
misc --->
gcc-runtime --->
libstdc++(ON)
$ petalinux-config -c kernel
//配置内核
Device Drivers --->
Generic Driver Options --->
Size in Mega Bytes(256)
[*] Staging drivers--->
[*] Xilinx APF Accelerator driver --->
[*] Xilinx APF DMA engines support
$ petalinux-build
$ petalinux-package --boot --format BIN --fsbl ./images/linux/zynq_fsbl.elf --fpga ./images/linux/system.bit --u-boot
编译成功后,在
现在,我们制作了所有的软件组件:
二、创建SDSoC平台文件
以官方提供的平台为模板来创建我们自己的平台文件。
Step 1. 复制
Step 2. 删除zc702_acp目录中的samples目录和src目录。
Step 3. 将文件名中所有的zc702_acp改为ZturnLinux。
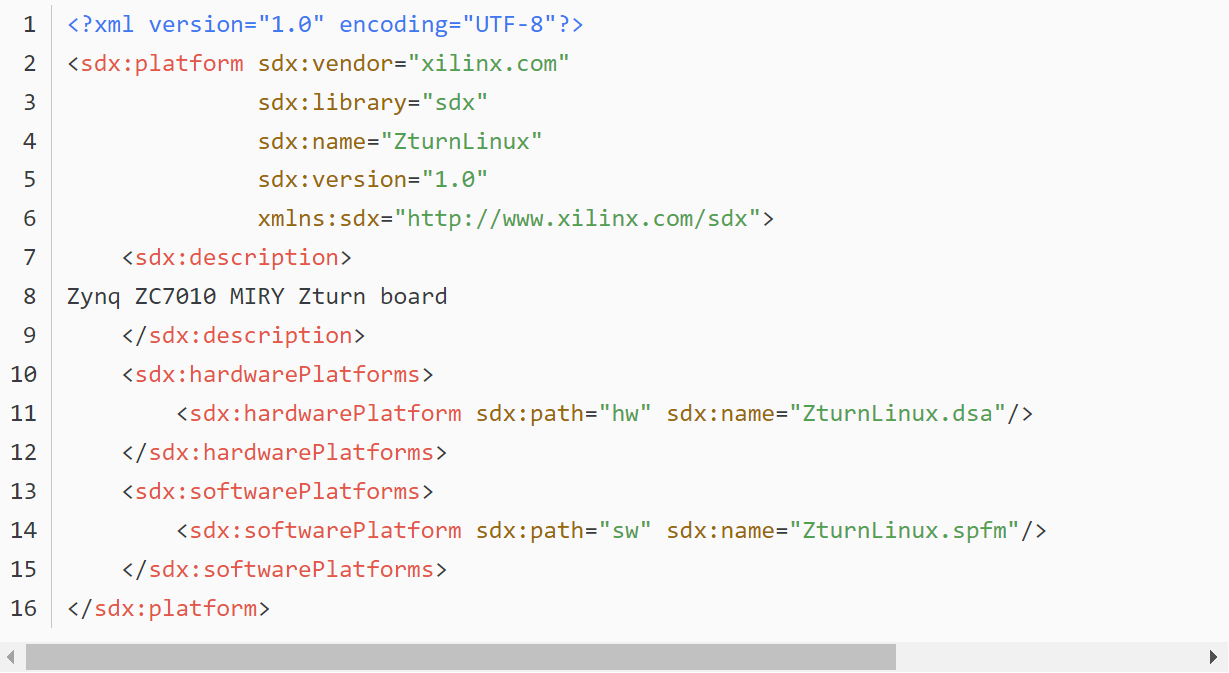
Step 4. 修改最顶级目录下的ZturnLinux.xpfm(修改前为zc702_acp.xpfm)
内容修改如下:
Step 5. 进入hw目录
将之前准备的DSA文件复制到该目录下。
Important:此处的DSA文件名与Step 4中
Step 6. 进入sw目录
修改zc702_acp.spfm为ZturnLinux.spfm.编辑内容如下:

Important:此处的spfm文件名与Step 4中
Step 7. 进入sw/linux/boot
将之前准备的fsbl.elf和u-boot.elf文件复制到这其中替换。如果这两个文件名一致可不用修改linux.bif文件。
Step 8. 将之前准备的image.ub复制到sw/linux/linux/image中进行替换。
Step 9. 将之前准备的devicetree.dtb重命名为qemu_devicetree.dtb,复制到sw/linux/qemu目录中进行替换,将u-boot.elf复制到该文件夹中进行替换。
三、测试SDSoC平台文件
创建新的应用工程,命名为testPlatform,在选择平台文件时,点击Add Custom Platform...,直接浏览到第二节中的ZturnLinux文件夹即可添加该平台到SDx系统中。
以mmult_pipeline为模板创建好工程,编译。在Debug/sd_card目录中生成了启动镜像,全部复制到SD卡根目录下。
mount /dev/mmcblk0p1 /mnt/
cd /mnt
./testPlatform
运行结果可能出错:
root@ZturnTemplate:/mnt# ./testPlatform.elf
ERROR: unable to open xlnk
解决办法:
在编译PetaLinux是使能CONFIG_XILINX_APF和CONFIG_XILINX_DMA_APF内核模块,在设备树文件(
/include/ "system-conf.dtsi"
/ {
xlnk {
compatible = "xlnx,xlnk-1.0";
};
};
重新编译后将image.ub替换之前的文件,clean testPlatform,重新编译工程,将SD Card Image中的文件复制到SD卡中重新启动。运行结果如下:
root@ZturnTemplate:/mnt# ./testPlatform.elf
Test for SDSoC platform
Number of CPU cycles running application in software:2068280
Number of CPU cycles running application in hardware:298788
Speed up: 6.92223
Note: Speed up is meaningful for real hardware execution only, not for emulation.
TEST PASSED