前面的中断学习中我们学了按键,GPIO,Timer,是时候把它们整合到一起了。今天我们混合使用PS/PL部分的资源,建立一个比较大的系统。
板子:zc702。
实现功能如下:
1.通过串口打印信息询问你要按SW5还是SW7;
2.当正确的按键被按下,定时器启动,关闭led DS23;
3.当定时器溢出后触发中断,开启DS23,系统回到1。
我们用一个AXI GPIO连接到SW5,EMIO连接SW7,MIO连接DS23(固定连接),定时器也使用PL的AXI Timer。
AXI Timer的主要特性:

硬件系统
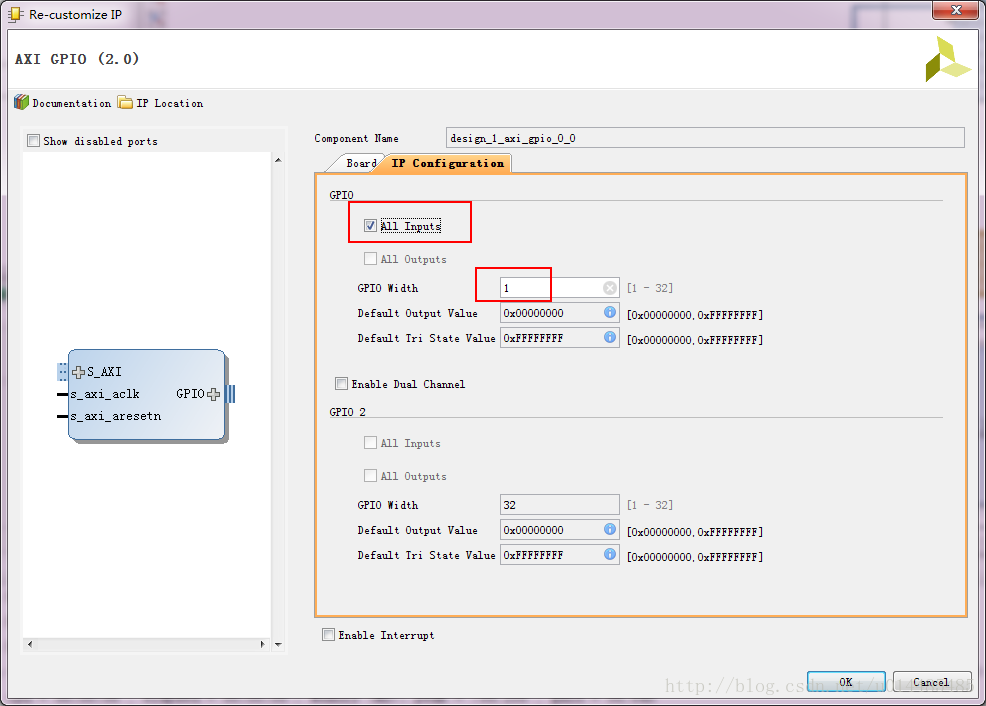
1.添加zynq核,AXI GPIO,AXI Timer
2.打开zynq核的配置,使能UART 1,使能GPIO MIO,添加1 bit的EMIO GPIO,使能PL-PS中断IRQ_F2P
3.AXI GPIO宽度设为1

4.点击自动连接,所有都可以自动连接
5.将zynq的IRQ_F2P[0:0] 连接到AXI Timer的interrupt,点击zynq的GPIO_0 右键Make External ,点击输出的引脚可以修改信号名称
生成顶层文件:

添加约束
连接到两个按键,AXI GPIO连接到SW5,EMIO 连接到SW7
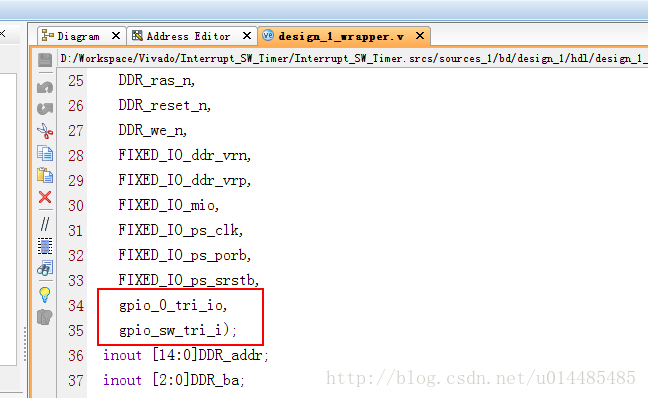
set_property PACKAGE_PIN G19 [get_ports {gpio_sw_tri_i[0]}]
set_property IOSTANDARD LVCMOS25 [get_ports {gpio_sw_tri_i[0]}]
set_property PACKAGE_PIN F19 [get_ports {gpio_0_tri_io[0]}]
set_property IOSTANDARD LVCMOS25 [get_ports {gpio_0_tri_io[0]}]
另外,LED DS 23连接在MIO 10:


生成比特文件,打开SDK。
软件部分
代码来自于Xilinx官方。
#include
#include "platform.h"
#include "xil_types.h"
#include "xgpio.h"
#include "xtmrctr.h"
#include "xparameters.h"
#include "xgpiops.h"
#include "xil_io.h"
#include "xil_exception.h"
#include "xscugic.h"
static XGpioPs psGpioInstancePtr;
extern XGpioPs_Config XGpioPs_ConfigTable[XPAR_XGPIOPS_NUM_INSTANCES];
static int iPinNumber = 10;
XScuGic InterruptController; /* Instance of the Interrupt Controller */
static XScuGic_Config *GicConfig;/* The configuration parameters of the
controller */
static int InterruptFlag;
//void print(char *str);
extern char inbyte(void);
void Timer_InterruptHandler(void *data, u8 TmrCtrNumber)
{
print(" Inside Timer ISR \n \r ");
XTmrCtr_Stop(data,TmrCtrNumber);
// PS GPIO Writting
print("LED 'DS23' Turned ON \r\n");
XGpioPs_WritePin(&psGpioInstancePtr,iPinNumber,1);
XTmrCtr_Reset(data,TmrCtrNumber);
print(" Timer ISR Exit\n \n \r");
InterruptFlag = 1;
}
int SetUpInterruptSystem(XScuGic *XScuGicInstancePtr)
{
/*
* Connect the interrupt controller interrupt handler to the hardware
* interrupt handling logic in the ARM processor.
*/
Xil_ExceptionRegisterHandler(XIL_EXCEPTION_ID_INT,
(Xil_ExceptionHandler) XScuGic_InterruptHandler,
XScuGicInstancePtr);
/*
* Enable interrupts in the ARM
*/
Xil_ExceptionEnable();
return XST_SUCCESS;
}
int ScuGicInterrupt_Init(u16 DeviceId,XTmrCtr *TimerInstancePtr)
{
int Status;
/*
* Initialize the interrupt controller driver so that it is ready to
* use.
* */
GicConfig = XScuGic_LookupConfig(DeviceId);
if (NULL == GicConfig) {
return XST_FAILURE;
}
Status = XScuGic_CfgInitialize(&InterruptController, GicConfig,
GicConfig->CpuBaseAddress);
if (Status != XST_SUCCESS) {
return XST_FAILURE;
}
/*
* Setup the Interrupt System
* */
Status = SetUpInterruptSystem(&InterruptController);
if (Status != XST_SUCCESS) {
return XST_FAILURE;
}
/*
* Connect a device driver handler that will be called when an
* interrupt for the device occurs, the device driver handler performs
* the specific interrupt processing for the device
*/
Status = XScuGic_Connect(&InterruptController,
XPAR_FABRIC_AXI_TIMER_0_INTERRUPT_INTR,
(Xil_ExceptionHandler)XTmrCtr_InterruptHandler,
(void *)TimerInstancePtr);
if (Status != XST_SUCCESS) {
return XST_FAILURE;
}
/*
* Enable the interrupt for the device and then cause (simulate) an
* interrupt so the handlers will be called
*/
XScuGic_Enable(&InterruptController, XPAR_FABRIC_AXI_TIMER_0_INTERRUPT_INTR);
return XST_SUCCESS;
}
int main()
{
static XGpio GPIOInstance_Ptr;
XGpioPs_Config*GpioConfigPtr;
XTmrCtr TimerInstancePtr;
int xStatus;
u32 Readstatus=0,OldReadStatus=0;
int iPinNumberEMIO = 54;
u32 uPinDirectionEMIO = 0x0;
u32 uPinDirection = 0x1;
int exit_flag,choice,internal_choice;
init_platform();
xStatus = XGpio_Initialize(&GPIOInstance_Ptr,XPAR_AXI_GPIO_0_DEVICE_ID);
if(XST_SUCCESS != xStatus)
print("GPIO INIT FAILED\n\r");
XGpio_SetDataDirection(&GPIOInstance_Ptr, 1,1);//AXI GPIO 1表示输入
xStatus = XTmrCtr_Initialize(&TimerInstancePtr,XPAR_AXI_TIMER_0_DEVICE_ID);
if(XST_SUCCESS != xStatus)
print("TIMER INIT FAILED \n\r");
XTmrCtr_SetHandler(&TimerInstancePtr,
Timer_InterruptHandler,
&TimerInstancePtr);
XTmrCtr_SetResetValue(&TimerInstancePtr,
0, //Change with generic value
0xff000000);
XTmrCtr_SetOptions(&TimerInstancePtr,
XPAR_AXI_TIMER_0_DEVICE_ID,
(XTC_INT_MODE_OPTION | XTC_AUTO_RELOAD_OPTION ));//Setting timer Option (Interrupt Mode And Auto Reload )
GpioConfigPtr = XGpioPs_LookupConfig(XPAR_PS7_GPIO_0_DEVICE_ID);
if(GpioConfigPtr == NULL)
return XST_FAILURE;
xStatus = XGpioPs_CfgInitialize(&psGpioInstancePtr,
GpioConfigPtr,
GpioConfigPtr->BaseAddr);
if(XST_SUCCESS != xStatus)
print(" PS GPIO INIT FAILED \n\r");
XGpioPs_SetDirectionPin(&psGpioInstancePtr, iPinNumber,uPinDirection);//MIO上的DS23 1代表输出
XGpioPs_SetOutputEnablePin(&psGpioInstancePtr, iPinNumber,1);//1 for Enabling Output Enable
XGpioPs_SetDirectionPin(&psGpioInstancePtr,
iPinNumberEMIO,uPinDirectionEMIO); //EMIO上的SW7 0代表输入
XGpioPs_SetOutputEnablePin(&psGpioInstancePtr, iPinNumberEMIO,0); //0 for Disabling Output Enable
xStatus=ScuGicInterrupt_Init(XPAR_PS7_SCUGIC_0_DEVICE_ID,&TimerInstancePtr);
if(XST_SUCCESS != xStatus)
//User selection procedure to select and execute tests
exit_flag = 0;
while(exit_flag != 1)
{
print("------- Menu Starts -------\r\n");
print("Press '1' to use NORMAL GPIO as an input (SW5 switch)\r\n");
print("Press '2' to use EMIO as an input (SW7 switch)\r\n");
print("Press any other key to Exit\r\n");
choice = inbyte();//等待串口输入
printf("Selection : %c \r\n",choice);
internal_choice = '1';
switch(choice)
{
// Use case for AXI GPIO
case '1':
exit_flag = 0;
print("Press Switch 'SW5' push button on board \r\n");
print(" \r\n");
while(internal_choice != '0')
{
Readstatus = XGpio_DiscreteRead(&GPIOInstance_Ptr, 1);
if(1== Readstatus && 0 == OldReadStatus )
{
print("SW5 PUSH Button pressed \n\r");
print("LED 'DS23' Turned OFF \r\n");
XGpioPs_WritePin(&psGpioInstancePtr,iPinNumber,0);
//Start Timer
XTmrCtr_Start(&TimerInstancePtr,0);
print("timer start \n\r");
//Wait For interrupt;
print("Wait for the Timer interrupt to tigger \r\n");
print(" \r\n");
while(InterruptFlag != 1);
InterruptFlag = 0;
print("Press '0' to go to Main Menu \n\r ");
print("Press any other key to remain in AXI GPIO Test \n\r ");
internal_choice = inbyte();
printf("Select = %c \r\n",internal_choice);
if(internal_choice != '0')
{
print("Press Switch 'SW5' push button on board \r\n");
}
}
OldReadStatus = Readstatus;
}
print(" \r\n");
print(" \r\n");
break;
case '2' :
//Use case for PS GPIO
exit_flag = 0;
print("Press Switch 'SW7' push button on board \r\n");
print(" \r\n");
while(internal_choice != '0')
{
Readstatus = XGpioPs_ReadPin(&psGpioInstancePtr,
iPinNumberEMIO);
if(1== Readstatus && 0 == OldReadStatus )
{
print("SW7 PUSH Button pressed \n\r");
print("LED 'DS23' Turned OFF \r\n");
XGpioPs_WritePin(&psGpioInstancePtr,iPinNumber,0);
//Start Timer
XTmrCtr_Start(&TimerInstancePtr,0);
print("timer start \n\r");
//Wait For interrupt;
print("Wait for the Timer interrupt to tigger \r\n");
print(" \r\n");
while(InterruptFlag != 1);
InterruptFlag = 0;
print("Press '0' to go to Main Menu \n\r ");
print("Press any other key to remain in EMIO Test \n\r ");
internal_choice = inbyte();
printf("Select = %c \r\n",internal_choice);
if(internal_choice != '0')
{
print("Press Switch 'SW7' push button on board \r\n");
}
}
OldReadStatus = Readstatus;
}
print(" \r\n");
print(" \r\n");
break;
default :
exit_flag = 1;
break;
}
}
print("BYE \r\n");
cleanup_platform();
return 0;
}
从main函数开始:
定义三个实例:
AXI GPIO实例:XGpio
AXI Timer实例:XTmrCtr
前面还定义了EMIO GPIO实例:XGpioPs
(EMIO Pin脚是54,DS 23 Pin脚是10)
AXI GPIO初始化:XGpio_Initialize
AXI GPIO设置数据方向:XGpio_SetDataDirection 1表示输入,这个IO是接SW5的
AXI Timer初始化:XTmrCtr_Initialize
设置AXI Timer中断处理器:XTmrCtr_SetHandler 这个处理器就是我们自定义的功能Timer_InterruptHandler(),中断发生之后去干嘛,这里我们实现的是点亮DS 23
设置AXI Timer初始值:XTmrCtr_SetResetValue
定时器功能设置:XTmrCtr_SetOptions
XTC_INT_MODE_OPTIONEnables the timer counter interrupt output.
XTC_AUTO_RELOAD_OPTIONconfigures the timer counter to reload from the compare value
PS的GPIO初始化:XGpioPs_LookupConfig XGpioPs_CfgInitialize
设置IO的数据方向:XGpioPs_SetDirectionPin //MIO上的DS23 1代表输出 | EMIO上的SW7 0代表输入
XGpioPs_SetOutputEnablePin ////1 for Enabling Output Enable 0 for Disabling Output Enable
GIC初始化:封装在ScuGicInterrupt_Init()函数
XScuGic_LookupConfig-->XScuGic_CfgInitialize
while循环:向控制台输入一个值,利用inbyte()接收,利用case选择是使用SW5还SW7触发定时器,触发后开启定时器,中断发生点亮DS 23。当标志位exit_flag不等于1持续这个操作,没有进入任何case分支,进入default,默认里面设置exit_flag=1,退出while,程序就结束了。
注:我在测试的时候,inbyte()会时不时抽风,需要重启应用程序,有待考究。
---------------------
作者:ChuanjieZhu
来源:CSDN
原文:https://blog.csdn.net/u014485485/article/details/79069445