本文转载自: OpenFPGA微信公众号
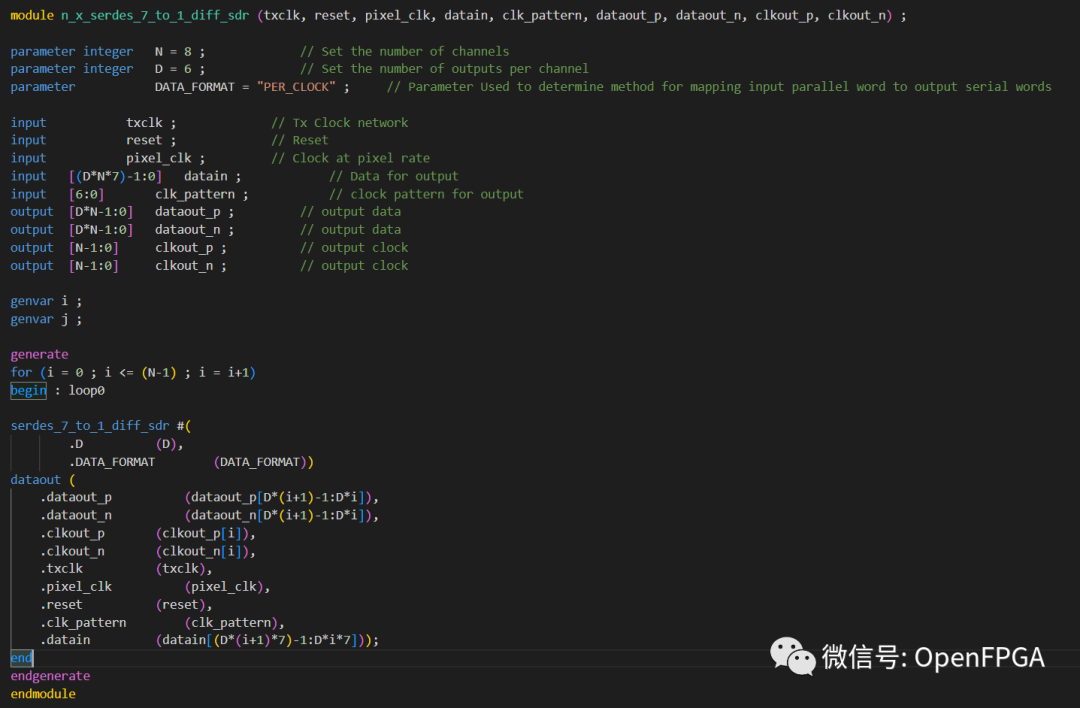
在使用xilinx官方例程《XAPP585》实现CameraLink接口发送或者接收数据时,有个程序还是值得学习的,下面把这段程序截出来:
genvar i ;
genvar j ;
generate
for (i = 0 ; i <= (N-1) ; i = i+1)
begin : loop0
serdes_7_to_1_diff_sdr #(
.D (D),
.DATA_FORMAT (DATA_FORMAT))
dataout (
.dataout_p (dataout_p[D*(i+1)-1:D*i]),
.dataout_n (dataout_n[D*(i+1)-1:D*i]),
.clkout_p (clkout_p[i]),
.clkout_n (clkout_n[i]),
.txclk (txclk),
.pixel_clk (pixel_clk),
.reset (reset),
.clk_pattern (clk_pattern),
.datain (datain[(D*(i+1)*7)-1:D*i*7]));
end
endgenerate
主要是generate的用法,整个文件的功能是实现可选多通道数据发送,我们知道Cameralink中对于多通道传输时有一部分功能代码时相同的,只不过需要多通道复用,我们知道generate有一个功能就是重复操作多个模块的实例引用,当然就适合本例程。
下面我们先讲一讲generate的用法再结合代码简单讲解一下,对于generate其实很好理解,只不过写出来比较难。
generate用法
关键字generate和endgenerate(和begin / end类似)作为使用语法的起点,有三种衍生结构,分别为:
使用generate的情况主要如下:

在这里我们思考一下,generate是在运行中构造重复模块吗??
答案是否定的,generate语句不是运行时构造。如果你想一想,这个generate结构实际上是在创建一个重复电路,我们不能即时添加或删除硬件电路,所以generate在综合过程中其实是重复构造相似电路,而不是在运行时构造。
下面先按照generate结构分别举例,然后举例几个常用案例。
generate - for语句结构
在使用generate - for语句之前,我们需要先声明一个变量genvar,用于for循环语句进行判断。
下面举两个不同应用的例子:

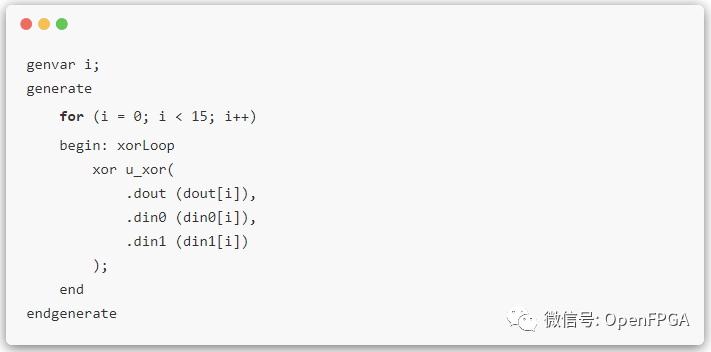
上面两个模块功能一样,第一个是对always 块进行了循环;第二个则是对实例化时的模块进行了循环。xorLoop 是 generate 语句模块名,目的是通过它对循环语句进行层次化引用,所以在上面栗子中的 xorLoop 模块相对层次名为 xorLoop[0].u_xor(后面会举例说明)
这里在对比两个常见的例子:
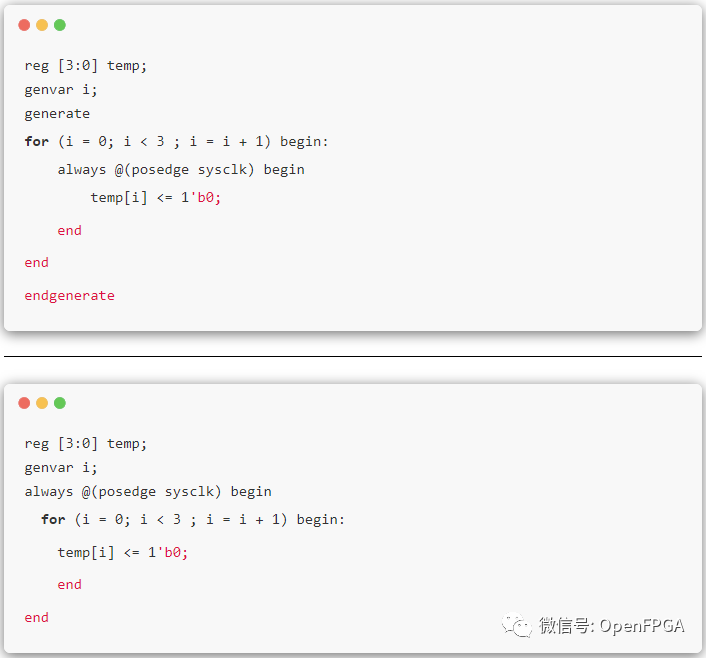

上面的例子功能也一样,一个使用generate...for语句一个使用for语句,关于这两者区别我会在文章最后总结里说明,大家可以自己先思考。
generate - if语句结构
generate -if 语句结构比较宽松,即不需要对不需要对generate语句进行命名(generate...for主要是对循环语句进行层次化引用) ,也不需要变量genvar。由于 generate - if 语句结构是通过判断语句执行代码块,这就决定了每次最多执行一个代码块,这种情况下,可以对各个代码块使用相同命名是合法的,且有助于保持对代码的层次化引用。
需要注意的一点是,在 generate 块中的判断条件必须是常量!

generate - case
generate - case 语句和 generate - if 语句核心思想都是进行条件判断,用法基本一致。
和 generate - if 语句一样,case 判断条件必须是常量。

下面按照应用场景举例:
循环生成构造
循环生成构造提供了一种简单而简洁的方法来创建模块项的多个实例,例如模块实例、分配语句、断言、接口实例等。你可以把它想象成一台“克隆机”。
本质上,它是一种特殊类型的for循环,其循环索引变量为 datatype genvar。这是一个有趣的事实- genvar它是一个整数数据类型,仅在综合时存在并在运行时消失。
我们看到的《XAPP585》的例程就是这种运行结构,下面再举例看下该语句的特点:
/** Example 1 */
/**
* 16 input mux
*
* Example of how to use Loop Generate Construct
*/
module mux_16(
input logic [0:15] [127:0] mux_in,
input logic [3:0] select,
output logic [127:0] mux_out
);
logic [0:15] [127:0] temp;
// The for-loop creates 16 assign statements
genvar i;
generate
for (i=0; i < 16; i++) begin
assign temp[i] = (select == i) ? mux_in[i] : 0;
end
endgenerate
assign mux_out = temp[0] | temp[1] | temp[2] | temp[3] |
temp[4] | temp[5] | temp[6] | temp[7] |
temp[8] | temp[9] | temp[10] | temp[11] |
temp[12] | temp[13] | temp[14] | temp[15];
endmodule: mux_16
仿真文件如下:
`timescale 1ns/1ps
/**
* Testbench to exercise the mux_16 module.
* Here we instantiate the mux 4 times. Each instance is
* fed a different input with different input `select` and
* the output is observed.
*/
module tb_mux_16;
logic clk;
logic [0:15][127:0] test_in[4];
logic [3:0] test_select[4];
logic [127:0] test_out[4];
int i, j, k;
initial begin
clk = 0;
forever #1ns clk = ~clk;
end
initial begin
// Set inputs
for (i=0; i < 4; i++) begin
for (j=0; j < 16; j++) begin
test_in[i][j] = 127'habcd_0000 + (i << 8) + j;
end
test_select[i] = i;
end
#2ns;
// Print outputs
for(k=0; k < 4; k++) begin
$display("test_out[%0d] = 0x%x", k, test_out[k]);
end
#2ns;
// Change input select
for (i=0; i < 4; i++) begin
test_select[i] = 10 + i;
end
#2ns;
// Print outputs again
for(k=0; k < 4; k++) begin
$display("test_out[%0d] = 0x%x", k, test_out[k]);
end
#10ns;
$finish;
end
genvar m;
generate
for (m=0; m < 4; m++) begin: MUX
mux_16 imux_16 (
.mux_in(test_in[m]),
.select(test_select[m]),
.mux_out(test_out[m])
);
end
endgenerate
endmodule: tb_mux_16
我们还可以嵌套generate...for 循环。只需确保genvars将外部循环和内部循环分开使用,并在嵌套的 for 循环中引用这些变量时要小心,这是一个经常犯错误的地方。
条件生成构造
条件生成构造允许根据在模块实例化期间传递的参数值更改设计结构。这在为设计创建参数化通用 RTL 模块时非常有用。
一个简单的例子:
/** Example 2.1 */
/**
* A simple generate example. This paramerter OPERATION_TYPE,
* passed when this module is instantiated, is used to select
* the operation between inputs `a` and `b`.
*/
module conditional_generate
#(parameter OPERATION_TYPE = 0)
(
input logic [31:0] a,
input logic [31:0] b,
output logic [63:0] z
);
// The generate-endgenerate keywords are optional.
// It is the act of doing a conditional operation
// on a parameter that makes this a generate block.
generate
if (OPERATION_TYPE == 0) begin
assign z = a + b;
end
else if (OPERATION_TYPE == 1) begin
assign z = a - b;
end
else if (OPERATION_TYPE == 2) begin
assign z = (a << 1) + b; // 2a+b
end
else begin
assign z = b - a;
end
endgenerate
endmodule: conditional_generate
另一个例子 - 我们需要创建一个通用 CRC 生成器的任务。团队中的其他设计人员应该能够在 3 个多项式中选择 1 个进行 CRC 计算。
这是一种方法 - 提供一个名为 CRC_SEL 的参数,该参数在此模块实例化时使用,此CRC_SEL参数用来选择在模块中生成哪个 CRC 函数。通过使用generate而不是简单的多路复用器,可以节省一堆门电路和触发器,因为不需要的 CRC 函数不会被实例化。

完整代码如下:
/**
* CRC generator module. Select the desired polynomial
* using the CRC_SEL parameter.
*
* Default polynomial : x^16 + x^15 + x^2 + 1
* CRC_SEL = 0 : x^16 + x^1 + 1
* CRC_SEL = 1 : x^16 + x^12 + x^5 + 1
*
* USAGE:
* + Strobe `start` when driving the first valid byte
* + Strobe `done` one clk after driving the last valid byte
* + The final CRC is available 1 clk after the last valid byte
* is driven. This is the same cycle you'll drive `done`.
*
*/
module crc_gen
#(parameter CRC_SEL = 0)
(
input logic clk,
input logic rst,
input logic start,
input logic done,
input logic [7:0] data_in,
input logic [15:0] crc_in,
output logic [15:0] crc_out
);
logic [7:0] data_in_d;
logic [15:0] crc_in_d;
assign crc_in_d = (start | done) ? 16'd0 : crc_in;
assign data_in_d = (done) ? 8'd0 : data_in;
always_ff @(posedge clk) begin
if (rst) begin
crc_out <= 'd0;
end
else begin
// Generate blocks are always assigned a name. If
// you don't name the generate block, it will be
// given a default auto generated name.
//
// To invoke a function within a generate block,
// hierarchically call it
//
crc_out <= crc_poly.nextCRC16_D8(data_in_d, crc_in_d);
end
end
// Once again the generate-endgenerate keywords are optional
// It is the act of using a parameter, CRC_SEL, in the case
// statement that makes it a generate block
//
// Also notice how all the generate blocks are given the same
// name `crc_poly` and all the function names are the same
// `nextCRC16_D8`. This is correct because only one of the
// function declarations is compiled in during elaboration
// phase.
generate
case (CRC_SEL)
0:
begin: crc_poly
// polynomial: x^16 + x^1 + 1
// data width: 8
// convention: the first serial bit is D[7]
function automatic [15:0] nextCRC16_D8;
input [7:0] Data;
input [15:0] crc;
reg [7:0] d;
reg [15:0] c;
reg [15:0] newcrc;
d = Data;
c = crc;
newcrc[0] = d[0] ^ c[8];
newcrc[1] = d[1] ^ d[0] ^ c[8] ^ c[9];
newcrc[2] = d[2] ^ d[1] ^ c[9] ^ c[10];
newcrc[3] = d[3] ^ d[2] ^ c[10] ^ c[11];
newcrc[4] = d[4] ^ d[3] ^ c[11] ^ c[12];
newcrc[5] = d[5] ^ d[4] ^ c[12] ^ c[13];
newcrc[6] = d[6] ^ d[5] ^ c[13] ^ c[14];
newcrc[7] = d[7] ^ d[6] ^ c[14] ^ c[15];
newcrc[8] = d[7] ^ c[0] ^ c[15];
newcrc[9] = c[1];
newcrc[10] = c[2];
newcrc[11] = c[3];
newcrc[12] = c[4];
newcrc[13] = c[5];
newcrc[14] = c[6];
newcrc[15] = c[7];
nextCRC16_D8 = newcrc;
endfunction
end
1:
begin: crc_poly
// polynomial: x^16 + x^12 + x^5 + 1
// data width: 8
// convention: the first serial bit is D[7]
function automatic [15:0] nextCRC16_D8;
input [7:0] Data;
input [15:0] crc;
reg [7:0] d;
reg [15:0] c;
reg [15:0] newcrc;
d = Data;
c = crc;
newcrc[0] = d[4] ^ d[0] ^ c[8] ^ c[12];
newcrc[1] = d[5] ^ d[1] ^ c[9] ^ c[13];
newcrc[2] = d[6] ^ d[2] ^ c[10] ^ c[14];
newcrc[3] = d[7] ^ d[3] ^ c[11] ^ c[15];
newcrc[4] = d[4] ^ c[12];
newcrc[5] = d[5] ^ d[4] ^ d[0] ^ c[8] ^ c[12] ^ c[13];
newcrc[6] = d[6] ^ d[5] ^ d[1] ^ c[9] ^ c[13] ^ c[14];
newcrc[7] = d[7] ^ d[6] ^ d[2] ^ c[10] ^ c[14] ^ c[15];
newcrc[8] = d[7] ^ d[3] ^ c[0] ^ c[11] ^ c[15];
newcrc[9] = d[4] ^ c[1] ^ c[12];
newcrc[10] = d[5] ^ c[2] ^ c[13];
newcrc[11] = d[6] ^ c[3] ^ c[14];
newcrc[12] = d[7] ^ d[4] ^ d[0] ^ c[4] ^ c[8] ^ c[12] ^ c[15];
newcrc[13] = d[5] ^ d[1] ^ c[5] ^ c[9] ^ c[13];
newcrc[14] = d[6] ^ d[2] ^ c[6] ^ c[10] ^ c[14];
newcrc[15] = d[7] ^ d[3] ^ c[7] ^ c[11] ^ c[15];
nextCRC16_D8 = newcrc;
endfunction
end
default:
begin: crc_poly
// polynomial: x^16 + x^15 + x^2 + 1
// data width: 8
// convention: the first serial bit is D[7]
function automatic [15:0] nextCRC16_D8;
input [7:0] Data;
input [15:0] crc;
reg [7:0] d;
reg [15:0] c;
reg [15:0] newcrc;
d = Data;
c = crc;
newcrc[0] = d[7] ^ d[6] ^ d[5] ^ d[4] ^ d[3] ^ d[2] ^ d[1] ^ d[0] ^ c[8] ^ c[9] ^ c[10] ^ c[11] ^ c[12] ^ c[13] ^ c[14] ^ c[15];
newcrc[1] = d[7] ^ d[6] ^ d[5] ^ d[4] ^ d[3] ^ d[2] ^ d[1] ^ c[9] ^ c[10] ^ c[11] ^ c[12] ^ c[13] ^ c[14] ^ c[15];
newcrc[2] = d[1] ^ d[0] ^ c[8] ^ c[9];
newcrc[3] = d[2] ^ d[1] ^ c[9] ^ c[10];
newcrc[4] = d[3] ^ d[2] ^ c[10] ^ c[11];
newcrc[5] = d[4] ^ d[3] ^ c[11] ^ c[12];
newcrc[6] = d[5] ^ d[4] ^ c[12] ^ c[13];
newcrc[7] = d[6] ^ d[5] ^ c[13] ^ c[14];
newcrc[8] = d[7] ^ d[6] ^ c[0] ^ c[14] ^ c[15];
newcrc[9] = d[7] ^ c[1] ^ c[15];
newcrc[10] = c[2];
newcrc[11] = c[3];
newcrc[12] = c[4];
newcrc[13] = c[5];
newcrc[14] = c[6];
newcrc[15] = d[7] ^ d[6] ^ d[5] ^ d[4] ^ d[3] ^ d[2] ^ d[1] ^ d[0] ^ c[7] ^ c[8] ^ c[9] ^ c[10] ^ c[11] ^ c[12] ^ c[13] ^ c[14] ^ c[15];
nextCRC16_D8 = newcrc;
endfunction
end
endcase
endgenerate
endmodule: crc_gen
下面是仿真文件及结果:
`timescale 1ns/1ps
/**
* Testbench to exercise the mux_16 module.
* Here we instantiate the mux 4 times. Each instance is
* fed a different input with different input `select` and
* the output is observed.
*/
module tb_mux_16;
logic clk;
logic [0:15][127:0] test_in[4];
logic [3:0] test_select[4];
logic [127:0] test_out[4];
int i, j, k;
initial begin
clk = 0;
forever #1ns clk = ~clk;
end
initial begin
// Set inputs
for (i=0; i < 4; i++) begin
for (j=0; j < 16; j++) begin
test_in[i][j] = 127'habcd_0000 + (i << 8) + j;
end
test_select[i] = i;
end
#2ns;
// Print outputs
for(k=0; k < 4; k++) begin
$display("test_out[%0d] = 0x%x", k, test_out[k]);
end
#2ns;
// Change input select
for (i=0; i < 4; i++) begin
test_select[i] = 10 + i;
end
#2ns;
// Print outputs again
for(k=0; k < 4; k++) begin
$display("test_out[%0d] = 0x%x", k, test_out[k]);
end
#10ns;
$finish;
end
genvar m;
generate
for (m=0; m < 4; m++) begin: MUX
mux_16 imux_16 (
.mux_in(test_in[m]),
.select(test_select[m]),
.mux_out(test_out[m])
);
end
endgenerate
endmodule: tb_mux_16
Footer
© 2022 GitHub, Inc.
Footer navigation
Terms
Privacy
Security
Status
Docs
Cont

断言和形式验证
generate - case 语句结构在编写断言时也非常有用,这反过来有助于形式验证。
如果对形式验证有任何经验,那么就会知道形式工具在尝试证明属性时很快就会遇到计算界限。因此,重要的是要保持属性简短而简单。
例如,如果有一个具有 8 个 REQquest 输入和 8 个 ACK 输出的仲裁器块,那么与其编写单个断言来覆盖所有 8 个 REQ/ACK 对,不如将其分解为具有 1 个 REQ/ACK 的 8 个单独的断言对。
/** Example 3.1 */
genvar k;
generate
for (k=0; k < 8; k++) begin
req_a: assert property (req[k] |=> ack[k]);
end
endgenerate
分层访问生成块
绊倒人们的一件事是如何访问位于生成块内的模块项。
生成块有一个名字。如果不为其命名,编译器将自动分配一个通用名称,例如genblk01,genblk02通常必须转储 wave 并查看Visualizer工具以查看分配了哪些名称。
要访问生成块中的模块项,必须分层访问它
这是来自 SystemVerilog LRM 1800-2012 的一个很好的示例(示例 4 第 27.5 节)。查看如何访问块中定义的任务和模块实例。
分层实例名称为:
memory.word16[3].p, memory.word16[2].p,
memory.word16[1].p, memory.word16[0].p,
/** Example 4 */
module dimm(addr, ba, rasx, casx, csx, wex, cke, clk, dqm, data, dev_id);
parameter [31:0] MEM_WIDTH = 16, MEM_SIZE = 8;
...
genvar i;
case ({MEM_SIZE, MEM_WIDTH})
{32'd8, 32'd16}: // 8Meg x 16 bits wide
begin: memory
for (i=0; i<4; i=i+1) begin:word16
sms_08b216t0 p(.clk(clk), .csb(csx), .cke(cke),.ba(ba),
.addr(addr), .rasb(rasx), .casb(casx),
.web(wex), .udqm(dqm[2*i+1]), .ldqm(dqm[2*i]),
.dqi(data[15+16*i:16*i]), .dev_id(dev_id));
// The hierarchical instance names are:
// memory.word16[3].p, memory.word16[2].p,
// memory.word16[1].p, memory.word16[0].p,
// and the task memory.read_mem
end
task read_mem;
input [31:0] address;
output [63:0] data;
begin // call read_mem in sms module
word[3].p.read_mem(address, data[63:48]);
word[2].p.read_mem(address, data[47:32]);
word[1].p.read_mem(address, data[31:16]);
word[0].p.read_mem(address, data[15: 0]);
end
endtask
end
...
endcase
endmodule
总结
这篇文章是在阅读《XAPP585》代码时候看着generate语法极其方便,所以引出了该篇文章,下面说下generate...for和for的区别:
首先第二个代码时错误的!
只有当 for 循环在 generate 中时,才能将 always 放在 for 循环中!
generate for 循环和常规 for 循环之间的主要区别在于 generate for 循环是为每次迭代生成一个实例。这意味着在示例中将有 3 个 always 块(与常规循环情况下的 1 个块相反)。
一个更好的例子是:
module A();
..
endmodule;
module B();
parameter NUM_OF_A_MODULES = 2; // should be overriden from higher hierarchy
genvar i;
for (i=0 i
}
endmodule;
在此示例中,常规 for 无法完成创建 NUM_OF_A_MODULES 实例的工作。
参考
https://blog.csdn.net/weixin_42150654/article/details/123132249
夏宇闻. Verilog数字系统设计教程(第三版)[M]. 北京: 北京航空航天大学出版社, 2013: 68.
数字IC小站, Verilog中generate的使用[EB/OL], https://zhuanlan.zhihu.com/p/107047600, 2020-02-15.
Formal Verification - Erik Seligman, et al.
题目练习
HDLbits上有两道使用Generate的题目,如下:
https://hdlbits.01xz.net/wiki/Adder100i
https://hdlbits.01xz.net/wiki/Bcdadd100
无需注册,可以练习Generate的语法使用,同时还有仿真。后续我会在《HDLBits: 在线学习 SystemVerilog》系列解析这两个题目。