作者:Chen Shaoyi,AMD工程师;来源:AMD开发者社区
官网上没有提供KR260的DPU预配置工程。在这篇博客中,我们将为 KR260 Vitis 加速平台创建硬件设计。 我们将从KR260预设文件开始,添加平台所需的外设并对其进行配置。 一切设置完毕后,我们将把硬件设计导出到XSA。
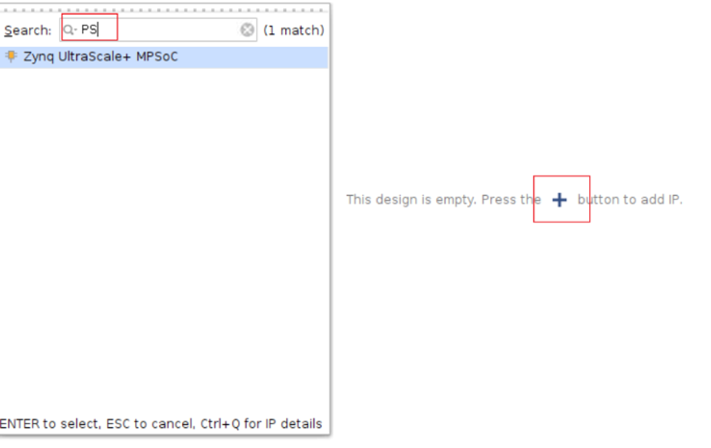
创建名为kr260_platform的Platform
Create Project > Next
Project name: kr260_platform > Next

勾选 "Project is an extensible Vitis platform" > Next

开发板选择Boards > KR260 > Next > Finish

如果没有安装KR260,需要先安装KR260

创建一个Block Design
Create Block Design > OK

Add PS > Run Block Automation > Apply Board Preset > OK
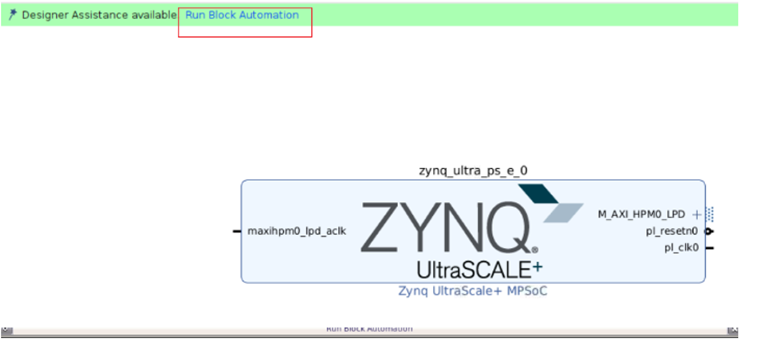

在此阶段,Vivado自动添加了 Zynq UltraScale+ MPSoC,并应用了 KR260 的所有板卡预设选项。 预设选项包括 MPSoC PS 模块配置和引脚分配。
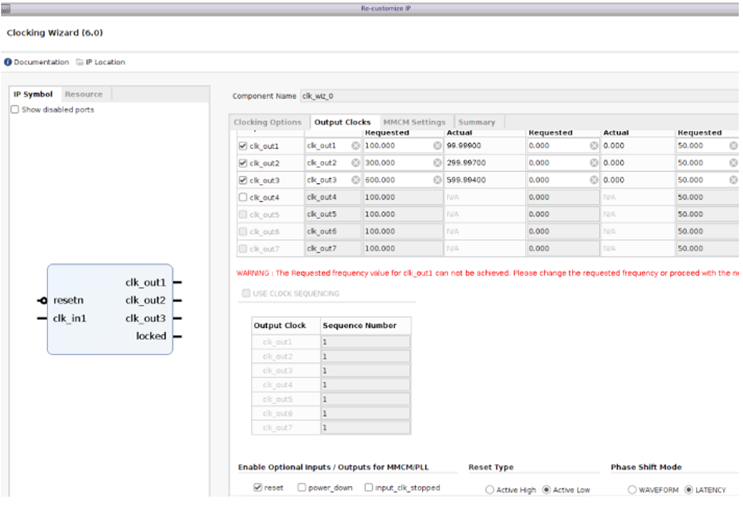
创建时钟和复位
Add a Clocking Wizard
clk_out1 to 100 MHz
clk_out2 to 300 MHz
clk_out3 to 600 MHz
Reset Type to Active Low > OK

使能Platform的AXI接口
使能PS的AXI Master接口
打开 Platform Setup 界面
打开 AXI Port 子页面
在zynq_ultra_ps_e_0选项下,使能 M_AXI_HPM0_FPD 和 **M_AXI_HPM1_FPD。**保持Memport为M_AXI_GP, sptag 为空。
使能来自AXI Interconnect的AXI Master interfaces
在ps8_0_axi_periph选项下, 点击 M01_AXI, 按住 Shift 并点击 M07_AXI 以选中从 M01_AXI 到 M07_AXI的多个接口.
右键选中的选项并点击使能.
保持 Memport 为M_AXI_GP,sptag 为 empty.
使能来自PS的AXI Slave interfaces来允许kernels 连接 DDR 内存
在 zynq_ultra_ps_e_0选项下, 选中所有的 AXI slave 接口: 按住 Ctrl 并点击 S_AXI_HPC0_FPD, S_AXI_HPC1_FPD, S_AXI_HP0_FPD, S_AXI_HP1_FPD, S_AXI_HP2_FPD, S_AXI_HP3_FPD.
右击所有的选项并点击 enable.
修改 S_AXI_HPC0_FPD 和 S_AXI_HPC1_FPD 的Memport 为 S_AXI_HP
将接口的 sptag 名字修改为HPC0, HPC1, HP0, HP1, HP2, HP3。 v++ 可以在 linking 阶段使用这些接口。

导出XSA
点击 Validate Design 按钮来确认 block design 设计有效。在这个过程中Vivado会报告一个critical warning,这是因为 /axi_intc_0/intr 没有被连接。因为v++链接器会将中断连接到这个端口上,所以这个警告可以被忽略。
为 block design创建一个module wrapper
在 Source 界面, Design Sources group上右键 design_1.bd
选择 Create HDL Wrapper...
选择 Let Vivado manage wrapper and auto-update.
点击 OK 来为 block design生成wrapper
生成设计
在Flow Navigator窗口下选择 Generate Block Design。
点击 Generate。
在Flow Navigator窗口下选择 Generate Bitstream。
点击 Yes.
导出 platform
点击菜单 File -> Export -> Export Platform 来运行 Export Hardware Platform wizard.
点击 Next .
选择 Platform Type为: Hardware, 点击 Next。
选择 Platform State: Pre-synthesis, 使能 Include Bitstream, 点击 Next
输入 Platform 属性并点击 Next. 比如,
. Name: kv260_hardware_platform
. Vendor: xilinx
. Board: kv260
. Version: 0.0
. Description: This platform provides high PS DDR bandwidth and three clocks.
输入 XSA 文件名: kv260_hardware_platform 并保持默认导出地址.
点击 Finish.
kv260_hardware_platform.xsa 将会被生成
参考链接:https://github.com/Xilinx/Vitis-Tutorials/tree/2022.2/Vitis_Platform_Cre...